![]()
How much will it cost to build and XK120 Replica?
Well that’s the $64,000 question and there is probably no definitive answer. What we can do is point you in the right direction with some hints and tips that will help you control your costs and achieve your goal. Help you set a realistic budget and then do everything you can to keep to it
Where shall we start?
The finished vehicle is basically a collection of parts wrapped in a coat of paint and fitted out to accommodate the driver and passenger in safety and comfort. So your task is to source the parts, fit or assemble them, paint and trim the finished vehicle, finally to have it tested to comply with the safety standards. Simple!
Sourcing parts.
 Most
of this is going to be blindingly obvious. You need a ready made
source of mechanical parts, Engine, Gearbox, Suspension, Wheels Prop Shaft,
Brakes, Electrical components, and many others both small and large.
It doesn’t take much to realise we just described another car, so why not
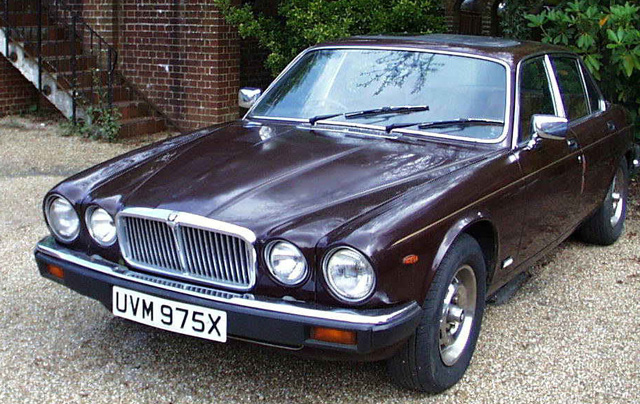
find a Donor vehicle? Any Jaguar XJ6 series 1, 2, or 3 will do. From
experience there are plenty around to choose from and are reasonably priced.
In my case £650 secured a vehicle that would have failed MOT and required a
lot of money spending on it to get it through. It was largely mechanically
sound but the bodywork was rotten. Don’t worry, the donor vehicle is
just a tin box containing most of the components you need and a good deal
more besides that you don’t need. There are also many components that on the
surface you don’t need but might just
come in handy. When buying a donor vehicle the usual things apply. Does it
have a service history? If it doesn’t it’s no big disaster, just pay close
attention to the engine condition. Does the engine run and sound OK? No
knocks rattles or other alarming noises. No smoke from the exhaust when the
engine is revved up. White condensation vapour on start up is probably OK.
Look at the oil on the dipstick. Is it clean? It can be jet black and still
be OK it just needs an oil change. The main thing is to make sure that
there are no water droplets in the oil or the oil is emulsified. This can be
sign of head gasket problems. Is the oil pressure OK? How high is the
mileage? Fewer than 100,000 is OK but the lower the better. If it is over
100.000 then you may have to consider re-conditioning the engine
Most
of this is going to be blindingly obvious. You need a ready made
source of mechanical parts, Engine, Gearbox, Suspension, Wheels Prop Shaft,
Brakes, Electrical components, and many others both small and large.
It doesn’t take much to realise we just described another car, so why not
find a Donor vehicle? Any Jaguar XJ6 series 1, 2, or 3 will do. From
experience there are plenty around to choose from and are reasonably priced.
In my case £650 secured a vehicle that would have failed MOT and required a
lot of money spending on it to get it through. It was largely mechanically
sound but the bodywork was rotten. Don’t worry, the donor vehicle is
just a tin box containing most of the components you need and a good deal
more besides that you don’t need. There are also many components that on the
surface you don’t need but might just
come in handy. When buying a donor vehicle the usual things apply. Does it
have a service history? If it doesn’t it’s no big disaster, just pay close
attention to the engine condition. Does the engine run and sound OK? No
knocks rattles or other alarming noises. No smoke from the exhaust when the
engine is revved up. White condensation vapour on start up is probably OK.
Look at the oil on the dipstick. Is it clean? It can be jet black and still
be OK it just needs an oil change. The main thing is to make sure that
there are no water droplets in the oil or the oil is emulsified. This can be
sign of head gasket problems. Is the oil pressure OK? How high is the
mileage? Fewer than 100,000 is OK but the lower the better. If it is over
100.000 then you may have to consider re-conditioning the engine
So you have a donor vehicle that you are going to reduce to a pile of bits. This leads us to the second category. There are parts you will need to source from Nostalgia. The most obvious of these are the chassis and the body. There are others like the Anti roll bar various body brackets. Of course, Nostalgia is a ready made source for other components like Bright work, such as windscreen, headlamp assemblies, wiring looms etc. It’s a judgment call on whether you are going to shop around for parts that are non exclusive to Nostalgia and fit them or make them fit or go for the convenience route.
If you have a budget constraint then shop around the 2nd user, the restoration and parts suppliers to see what’s available and / or adaptable to your needs. For Example, you can’t use the heater from the XJ6, but can you make use of the heater from a Fiesta or a Mini? You may end up coming back to Nostalgia as the cheapest and most reliable source but at least you’ve looked. Get a copy of
“Jaguar World” and browse the adverts for suppliers and contacts. Check out if you have a specialist Jaguar car dismantler in your area. They can be a very useful source of new and used components. Be careful of genuine bright work components these may not be SVA compliant (e.g. Windscreen, headlamps, Headlamp Spears). The National Jaguar Spares Day at Stoneleigh and Beaulieu, as well as the many Kit Car shows around the country, are great places to source 2nd user parts
There will be sundries to buy, like bolts, screws and metal for brackets. Kit Car shows are a great source for these items. Metal Strip can often be sourced for your local B&Q. Metric bolts can be sourced from suppliers like “Screwfix”. For UNF and UNC bolts find a local hardware supplier and see what you can pick up, inexpensively, in small quantities. Nostalgia also supply fixing kits if necessary.
Donor Vehicle
 Nostalgia lists the major components that
required from the donor vehicle in the publicity for the XK120 and in the
build manual. The expense of building your new car will be directly
affected by how much work you do on these components. Brake callipers and
hydraulic cylinders etc can be part exchanged but can also be refurbished
using a kit of parts available through your local / internet auto part
supplier. The same is true of all suspension and wheel bearings.
Nostalgia lists the major components that
required from the donor vehicle in the publicity for the XK120 and in the
build manual. The expense of building your new car will be directly
affected by how much work you do on these components. Brake callipers and
hydraulic cylinders etc can be part exchanged but can also be refurbished
using a kit of parts available through your local / internet auto part
supplier. The same is true of all suspension and wheel bearings.
But it doesn’t end there. On the surface you do not require the major wiring loom from the donor. Re-engineering it to fit the XK120 would be a mammoth task, because it contains the wiring for air conditioning, electric windows, and window heating and a whole host of stuff that is never going to be fitted to your XK120. . It is more cost effective to use a loom from Nostalgia. However the XJ6 wiring loom is a major resource for relays, switches, wire, bulbs, connectors etc. Strip it out and store it, at least until you are finished. It may just contain something useful in the future.
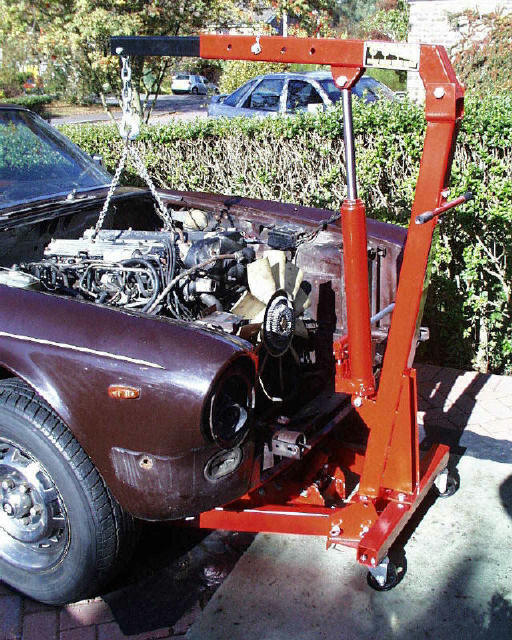
The engine and gearbox once removed from the donor vehicle can be used in your XK120. The question is? refurbish or not refurbish, auto or manual gearbox. A well cared for XK120 engine, regularly serviced in its former life will last well over 100,000 miles. It is a personal judgement on the engine and its state, at the time of removal that will determine if it needs to be refurbished, and how much is required. If it is running well in the XJ6, you will probably get away with dropping it straight in to the XK120. If in doubt get it reconditioned or DIY. There are numerous companies that will refurbish part of or the entire engine both locally and nationally the price will vary depending on what needs to be done.
Most XJ6’s are Auto transmission equipped. Some early vehicles had manual gearboxes. To control your budget you could stick with whichever gearbox is fitted. If you can’t face an automatic Transmission in your XK120 then try and source a manual XJ6. Converting an Auto to a manual can be done but will involve additional expense for sourcing a gearbox, bell housing, clutch, hydraulic cylinders and clutch pedal. The good news is the XJ6 pedal box is already to accept an additional pedal.
When stripping the donor down to its component parts, if in doubt, keep it. You can always throw it away later but it will cost you to replace it, if it’s gone. Keep the windscreen wiper motor. It is useable but you will need to replace the wiper arms and blades. Keep all the Instruments and instrument wiring harness. You may have to have the speedometer recalibrated if you change the gearbox. Keep the door mirrors; using these could save a few bob. Keep ALL the door locks and the locking hasps, you will only use two but you can choose the best ones to use. Keep washer bottle, header tank, oil cooler these can all be used in your 120. You will need a bonnet catch and lock. There are two on the XJ6 bonnet keep them both to give you a choice of which to use. Also keep the bonnet release cable and handle it can be used on the 120. Finally keep both heater blower motors. . You only need one but can make one good one out of the two if necessary.
Using the steel wheels from your XJ6 can save £1000. (The cost of wire wheels) You can always fit wire wheels at a later date and besides you can’t fit them until after SVA. If you are looking for a period look source some Mk2 steel wheels from your local dismantler or the Intern
Finally, a point I missed earlier. If you really don't need a part, like hub caps bumpers, headlights, sidelights, seats etc. try and sell them. You will be amazed what sells on e-bay. There is evidence that builders can make a profit by selling off non required parts.
Rolling Chassis
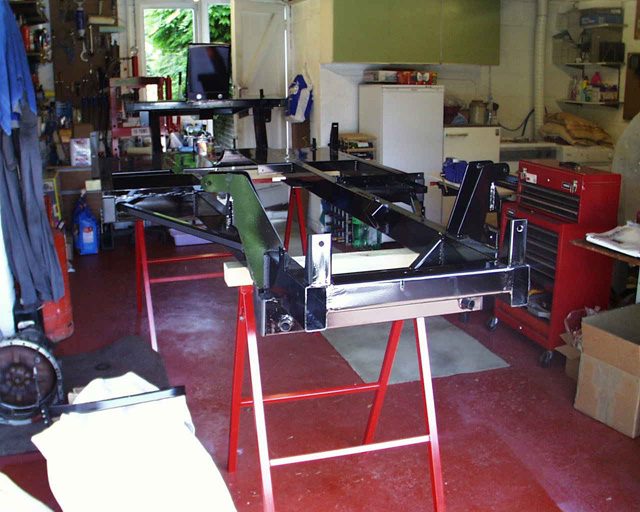 Now you are in to the realm of Nostalgia
exclusive components. The chassis is complete with all brackets etc to
accept the differential and suspension components from the XJ6. Purchasing
the rolling chassis kit is probably the most cost effective way of obtaining
the chassis, front bulkhead and shock absorbers. To keep the cost down
refurbish as much of the suspension and brake components as you can. Part
exchange components where necessary or for safety reasons. Transfer these
components to the new chassis.
Now you are in to the realm of Nostalgia
exclusive components. The chassis is complete with all brackets etc to
accept the differential and suspension components from the XJ6. Purchasing
the rolling chassis kit is probably the most cost effective way of obtaining
the chassis, front bulkhead and shock absorbers. To keep the cost down
refurbish as much of the suspension and brake components as you can. Part
exchange components where necessary or for safety reasons. Transfer these
components to the new chassis.
The lower fulcrum and the rear drive shafts and prop shaft need to be shortened. For safety reasons part exchange these components with Nostalgia. You will probably need to replace the brake discs but these are not expensive when source from you local parts supplier. It is worth mentioning you can make a saving by using aftermarket parts rather than sourcing them from your local Jaguar Dealer. You can also use national mail order companies like SNG Barratt to source parts.
You will need to obtain a new steering rack (the XJ6 one is too wide and power assisted.) The best source for a steering rack is a modified Peugeot one from Nostalgia.
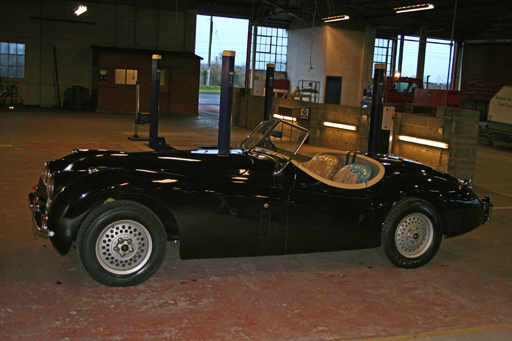
Body
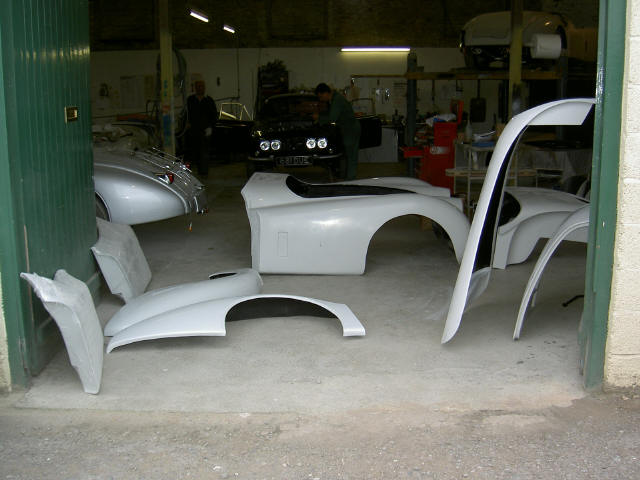 The body comes in 8 parts purchased from
Nostalgia. Nothing can be done to reduce the expense of buying the body
kit. All the work and the potential savings are made by fitting it and
“fettling it” yourself. The more you do, the less there is for the finisher
to do, the less the final expense of painting and trimming. This is the
vehicles crowning glory it is worth taking time over getting it right. Fit
the body paying particular care to the dimensions in the build manual. Try
and get all joints and gaps to a uniform width of 3 - 4 mm. Align the
contours as best you can and if they are not right ask Nostalgia for
advice. Photographs of your problem with bodywork fitting can be invaluable
in getting the correct advice from Nostalgia. It gives them valuable
information and enables them to give you specific advice on how to fix it.
The body comes in 8 parts purchased from
Nostalgia. Nothing can be done to reduce the expense of buying the body
kit. All the work and the potential savings are made by fitting it and
“fettling it” yourself. The more you do, the less there is for the finisher
to do, the less the final expense of painting and trimming. This is the
vehicles crowning glory it is worth taking time over getting it right. Fit
the body paying particular care to the dimensions in the build manual. Try
and get all joints and gaps to a uniform width of 3 - 4 mm. Align the
contours as best you can and if they are not right ask Nostalgia for
advice. Photographs of your problem with bodywork fitting can be invaluable
in getting the correct advice from Nostalgia. It gives them valuable
information and enables them to give you specific advice on how to fix it.
Cooling System.
You will need a new radiator, the XJ6 one is too big. Modifying it, needs a specialist manufacturer. It’s cheaper to source a new one via Nostalgia, and then you know it is serviceable and will fit. Use as many of the XJ6 hoses as you can, but it is not expensive to buy an XJ6 hose set from SNG Barratt and avert problems from perished or old hoses. Use the catch tank and for that matter the washer bottle from the XJ6.
Brightwork
Source these items from Nostalgia or wherever you can. Fit as little or as much as you want. If it is not there at SVA, it can’t be treated and providing it is not essential for safety reasons then it’s OK. If you don’t have a windscreen you don’t have to have windscreen wipers or washers. For SVA.
Electrics and Instruments,
Start out with a main wiring loom from Nostalgia. The Dashboard layout can be made and designed by you from plywood and covered or veneered as you wish to take the standard XJ6 instruments. . Use SVA compliant headlights an other lighting such as side lights and indicators. Many of these can be sourced from Electrical suppliers such as Vehicle Wiring Products. Use as many parts of the XJ6 as is feasible, Starter motor, Alternator, switches, relays, If it isn’t a direct fit explore ways to make it fit.
Painting.
It is impossible for anyone to achieve a high quality finish in their home garage with a spray gun on the end of a vacuum cleaner. This has to be done professionally but who does it is up to you and your budget. Some finishing of the bodywork in preparation for painting is inevitable, but the more you do in the bodywork section above and the preparation work prior to painting will drastically reduce your costs. View it this way every hour spent rubbing down the body, to get the contours right, the gaps tight and the overall bodywork smooth saves you £40.
Trimming
Trimming is another specialist skill which is best done professionally. You can be quite minimalist about this and complete the trimming later. Seats and Seat Belts are a must. But make dummy panels to cover up various holes for safety’s sake. It doesn’t have to be completely trimmed for SVA.
SVA
 This is not directly linked to building for a
budget apart from the fact that it is unavoidable. Throughout the build
think SVA. The car does not have to be painted or completely trimmed for
SVA. Think safety and whether the SVA tester is going to accept what you
have done. Does it conform to his script (the SVA Manual)? Most of it is
common sense but there are some bureaucratic rules to follow. Why is this
important when building to a budget? At any VOSA testing station, outside
Taunton, the test centre is unlikely to have seen a Nostalgia Replica
before. Therefore he is unfamiliar with the product and what to expect. With
any unfamiliar vehicle he is going to look at everything very closely. The
same will be true of Taunton, because the tester there is used to seeing
complete cars from Nostalgia. If all this sound gloomy, not so, decide where
you are going to have your car tested, (it is supposed to be the nearest
one) and work with them, certainly towards the final stages of the build, to
present an acceptable car. That way there are no surprises for them or you.
This is not directly linked to building for a
budget apart from the fact that it is unavoidable. Throughout the build
think SVA. The car does not have to be painted or completely trimmed for
SVA. Think safety and whether the SVA tester is going to accept what you
have done. Does it conform to his script (the SVA Manual)? Most of it is
common sense but there are some bureaucratic rules to follow. Why is this
important when building to a budget? At any VOSA testing station, outside
Taunton, the test centre is unlikely to have seen a Nostalgia Replica
before. Therefore he is unfamiliar with the product and what to expect. With
any unfamiliar vehicle he is going to look at everything very closely. The
same will be true of Taunton, because the tester there is used to seeing
complete cars from Nostalgia. If all this sound gloomy, not so, decide where
you are going to have your car tested, (it is supposed to be the nearest
one) and work with them, certainly towards the final stages of the build, to
present an acceptable car. That way there are no surprises for them or you.
Summary
- There is no definitive cost. Set your budget as realistically as possible and work to it.
- The more of the donor or 2nd user parts you use the more you are controlling your budget without incurring additional expense
- Use every source you can think of, from Auto Jumble to the Internet to find parts- Dare I say EBay!
- There are unavoidable parts to buy from Nostalgia like Chassis Kit and Body Kit
- The more work you do the cheaper it becomes.
- The car doesn’t have to be painted or completely trimmed to pass SVA. Just safe and conform to the SVA standards.
- Nostalgia’s estimate of 25K on the road is realistic, it may be possible to do it cheaper
My thanks to Chris Calvert for prompting me ot write this. I hope all goes well with the build.